


With any new Nextcloud installation, you may have a few system issues that arise. Don’t worry they are easy to fix, and this post should show you all the modifications you need to make. Let’s start to fix system issues in Nextcloud now.
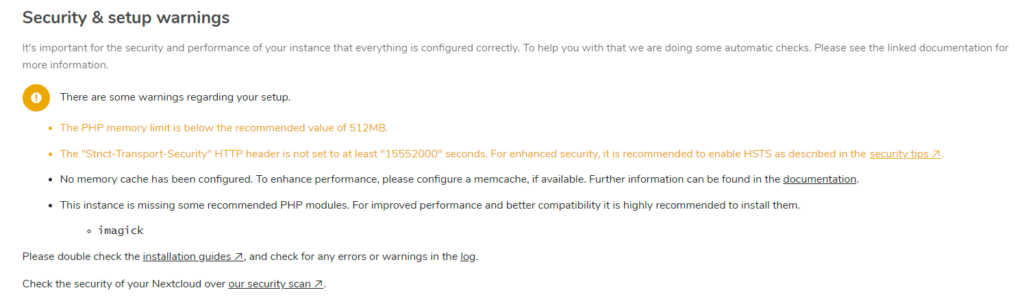
You can check for issues by clicking the gear icon on the right side of the top bar then selecting Settings and under Administration click on Overview;
PHP.ini Settings:
You will need to edit your PHP.ini settings; SSH into your terminal and edit your PHP.ini file,
sudo nano /etc/php/7.2/apache2/php.ini
Find the entry for memory_limit and change it from “memory_limit = 128M” to “memory_limit = 512M”;
While you’re in the PHP.ini file, edit the following values as well to speed up your Nextcloud;
opcache.enable=1
opcache.interned_strings_buffer=8
opcache.max_accelerated_files=10000
opcache.memory_consumption=128
opcache.save_comments=1
opcache.revalidate_freq=1
Save and exit out of the file by pressing “Ctrl + O” and then “Enter” to save followed by “Ctrl + X” to exit out of the file. Then restart your php by using the following command below;
sudo systemctl restart apache2
Enable HSTS:
Go to the Nextcloud app store then click the tools category and find the app called “HSTS Header”; Click “Enable untested app” then click “Download and enable” to install the app. This should enable HSTS for you.
Memory Cache:
To speed up Nextcloud install and configure a memory cache using the lines of code below;
sudo apt install php7.2-apcu redis-serverredis-server
Edit the Nextcloud Config.php file to add enable memory caching; Go into your Nextcloud installation directory,
sudo nano config/config.php
Add the following to the configuration file. Note: Make sure you add the lines above the final “);” or you will break your configuration.
'memcache.local' => '\OC\Memcache\APCu',
'memcache.locking' => '\OC\Memcache\Redis',
   'redis' =>
   array (
     'host' => '127.0.0.1',
     'port' => 6379,
   ),
Save and exit out of the file by pressing “Ctrl + O” and then “Enter” to save followed by “Ctrl + X” to exit out of the file.
Apache Config:
To ensure proper service discovery we must edit the following files; Since we are using VestaCP the files will be located as follows, make any necessary changes to the lines of code as required.
sudo nano ~/conf/web/cloud.mstd.me.apache2.ssl.conf
Add this code to the conf file; add the code below the server name,
<IfModule mod_rewrite.c>
  RewriteEngine on
  RewriteRule ^/\.well-known/host-meta /nextcloud/public.php?service=host-meta [QSA,L]
  RewriteRule ^/\.well-known/host-meta\.json /nextcloud/public.php?service=host-meta-json [QSA,L]
  RewriteRule ^/\.well-known/webfinger /nextcloud/public.php?service=webfinger [QSA,L]
  RewriteRule ^/\.well-known/carddav /nextcloud/remote.php/dav/ [R=301,L]
  RewriteRule ^/\.well-known/caldav /nextcloud/remote.php/dav/ [R=301,L]
</IfModule>
Save and exit out of the file by pressing “Ctrl + O” and then “Enter” to save followed by “Ctrl + X” to exit out of the file.
If you use nginx as a reverse proxy add this line to your domains nginx configuration file;
sudo nano ~/conf/web/cloud.mstd.me.nginx.ssl.conf
    location = /.well-known/carddav {
      return 301 $scheme://$host/remote.php/dav;
    }
    location = /.well-known/caldav {
      return 301 $scheme://$host/remote.php/dav;
    }
Save and exit out of the file by pressing “Ctrl + O” and then “Enter” to save followed by “Ctrl + X” to exit out of the file.
Now restart both Apache2 and if necessary Nginx as well;
sudo systemctl restart apache2sudo systemctl restart nginx
ImageMagick PHP module:
This module helps generate image previews for your Nextcloud installation; Install it with the line of code below,
sudo apt install php-imagick
sudo systemctl restart apache2

Once you fix system issues in Nextcloud your instance should run smoothly and without any problems. Good Job. To install Nextcloud follow our tutorial here.


